Friday, September 28, 2012

MIA part 2: vacation

Last post I pointed you to my friend Julie's blog and you might have figured out that a bunch of us went on vacation together.  These are my college friends, dubbed the Lunch Bunch because we all had lunch together several times a week back in our Kent State days.  The group has spread to both coasts, with one family in Massachusetts and one in Washington state.  The last time we all got together for a vacation we went to New England.

July 4, 2001

So this time we decided to meet on the left coast, specifically, Fort Stevens State Park, on the Oregon coast very near the Washington state line.  The Bunch has grown since then. The two oldest boys for some reason didn't want to go on a cross country train ride with their parents.  Teenagers - go figure. :-)  
 
July 11, 2012, photo stolen from JulieZ

It was great to have everyone together again and the Oregon coast is beautiful.  I didn't take a lot of pictures but here are a few of the ones I did take:

Our home away from home, one of the four, that is

Pelicans and sea gull at the beach in the park
There were lots of these footprints on the beach


It's really beautiful out there


You might remember this from The Goonies


All of those orange blocks?  Tillamook cheddar cheese, yum!

The Octopus Tree
These thistles were around the tree


Multnomah Falls - featured in a car commercial this summer

After we all separated, some of us headed southeast to Sisters, Oregon for the annual Sisters Outdoor Quilt Show - the world's largest outdoor quilt show.  The show was great, but a little overwhelming. Then later in the afternoon, it rained.  The quilt rescue crews took down all the quilts in record time, very impressive.

The Three Sisters mountain range


There were quilts hanging all over town

Seriously, every vertical surface had a quilt on it.

I had a layover in San Francisco and they changed the gate for my flight. It was a good thing, because they had a huge exhibit about the history of sewing machines.  I won't bore you with all the pictures, but here are a few of my favorite.

Lots of sewing-related toys
Toy machines

These sliding frames were used to draft clothing patterns

These old machines were really cool


A collection of antique irons and pressing tools

Wednesday, August 22, 2012

MIA part one - yarn and knitting

It has been pointed out that I am a total slacker lately, at least as far as the blog is concerned.  And it's totally true.  I keep thinking to myself - I really should post something on the blog, and then I end up doing something else.  Lately, that something else has been knitting.

I finished the socks I started for my mom at Christmas.
 
Pattern: Stepping-Stones by Clara Parkes, Yarn: Sensations Bamboo and Ewe, color 49372


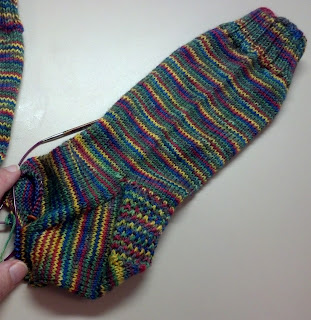
Plain vanilla socks in Destination Yarn Postcard in Vancouver Five Rings


I've made progress on my Olympic socks. I'm past the heels and the gusset decreases, so now I just have to finish the feet and toes.  These go slowly, because I keep them in my purse as emergency knitting and only work on them occasionally.


Falling Leaves, by Antje Gillingham, Knit Picks Stroll Tonal in Foliage


I've also been working on my Fall Foliage socks, which I started along with three of my friends on New Year's Eve.  These are toe-up, so I have the feet done and one of them has a heel.  I need to sit down and finish that heel, then I'll just have to knit the legs till they're long enough or I can't stand it anymore, whichever comes first.


Another knit along with the same three friends is my "Fashionably Late Lady" sweater, which I was supposed to start on Leap Day, but didn't actually start till March 1st.
 
February Lady, by Pamela Wynne, Berroco Vintage in Juniper

For our various progress on these two projects as of July 11th, see Julie's blog here I don't think my sweater is much farther along than it was then, but the socks are.
 
Sinuosity by Dawn Matkovic, Destination Yarn, Sea


I ripped out my Sinuosity by the Sea socks, because I decided they were going to be too tight. It would have been silly to keep going and finish a pair of socks that I love, but can't wear.  So they now look like this:

I will start them over at some point. 


Medallion Lace Socks, by Andrea Fox, String Theory Caper, Winterberry


I recently picked up my Berry Medallions socks, which have been hibernating for at least a year.  They're coming along nicely, and while they look a little wonky on the needles, they block out nicely.


 In addition to socks and the sweater, I've been working on several shawls.  

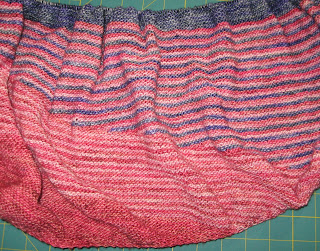
First up, Color Affection.  This pattern has been very popular lately, in part because it's been "Harlotized".  That's what happens when The Yarn Harlot posts a project on her blog and thousands of knitters scramble to do the same pattern.  Mine is made using the colors Harlot herself helped me pick out when she was here in May.  It's pretty close to done.  I only have an inch of the blue edging.  (The shawl is actually upside down in the picture.)
 
Color Affection by Veera Valimaki, Tosh Merino Light - Fragrant, Posy and Volga


Summer Solstice by Wendy D. Johnson, Destination Silk Road, Rainy Afternoon

In mid-June, I set that aside to start the 2012 Summer Solstice Mystery Shawl KAL from Wendy D. Johnson. This was given out one clue at a time over the course of about a month.  I was actually keeping up really well until the last clue.  


Close-up of beaded edge

It turns out the shape is more like a capelet and it's not something I will ever wear. I love the yarn and beads too much to leave it as something I will never use.  One of my fellow knitters skipped the last clue and put some garter stitch a the top, which I like.  And someone else ripped hers all the way out and started something completely different.  I'm not sure what I want to do with mine, so it's going to hibernate for a while.


THEN, while I was on vacation (more about that in another post) my friend Ann and I cast on the Multnomah shawl while at Multnomah Falls.  Pretty nifty, huh?
 
Multnomah, by Kate Ray, Destination Yarn Postcard, Yosemite


Leaf Lace Shawl by Evelyn Clark,Cherry Tree Hill Supersock DK
And finally, as part of the Ravellenic Games (formerly the Ravelympics, till the US IOC made them change the name), I entered the WIP wrestling event.  A WIP is a Work In Progress and to be eligible for the event, you can't have worked on the project since before May 15.  No problem.  My Leaf Lace Shawl has been sitting my sewing room for at least a year and half. It kicked my butt every time I tried to work on it, because I just wasn't getting the "move your stitch markers around every other row" thing.  I kept thinking I was doing it wrong.  Once I figured out the problem and got going, I finished it in less than a week.
 

I used big beads on this one since there aren't many


I'm looking over my list of projects and I have to say I'm very happy to have found my knitting group.  Destination Yarn is one of them and I admit I have her sock yarn in about half of her colorways.  I've only actually finished one project with it, but the colors are amazing.   The Silk Road is half silk and incredibly soft.  The designers of the Sinosity and Medallion Lace socks are part of our group and there are a few other gals who design patterns, too.  It's a very talented collection of knitters.  They're the reason Thursday has become my favorite night of the week.

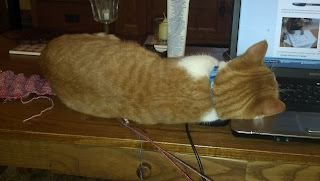
Max has been very helpful with my projects and is a great multi-tasker. 
 
"Zzzzzzz....."


Friday, June 29, 2012

Bag lady 2012

I've been on a bit of a bag kick lately.  In addition to the 30-odd feed bag totes, I've made just a few others.  It started with this little project bag with the cupcake fabric.

Just right for a pair of socks


Then I moved on to this.

Outside


It's the Key West Plus tote, made from the Florida version of the Trace 'n Create Template from Clover.


Inside


The pattern didn't call for an inside pocket, but I thought it needed one.  I used fusible fleece on the outer fabric and some kind of lightweight interfacing (whatever I had lying around) on the lining fabric.  It's a nice size and I like fabrics. 

It's a little floppy, though, and I wanted something a little more sturdy.


I had some fabric in the stash that makes me happy, so I made another one.

So happy
I added an inner zipper pocket
This time I found some thin quilt batting and used some fusible web to attach it to the outer fabric.  It has a little more body and it's Very Bright.  I think I love it. :-)

 I made these to use when I go on vacation this summer.  There's a whole group of us going to the Oregon coast, and we decided that all of the ladies should have one.  Two of the local gals made their own.  I made these to send to the other two.


The color isn't really great in the pictures, but I love both of these, too.


Once I got those out of my system (for now). I moved on to something silly, a little purse made of duct tape. Sure, it's dorky, but it was too hot to wear the duct tape bustier...

For the Duct Tape Festival, of course

But my favorite one from my latest bag bender is the Professional Tote.  There are a lot of pieces to cut out and fuse interfacing to, but the pattern is well written and totally worth effort.

It has a double front pocket - there's an open pocket behind the zippered one. The pockets on the sides are gathered with leather ties and I added some gold bead caps.  The ties are a little long, so I need to shorten them.


Back

On the back there's a big pocket and above that is a strap that you can slide over the handle of your rolling suitcase to keep it in place. You have to look kind of close to see it.


The inside used to have a zipper pocket in the middle, but I decided I didn't want the the inside to be divided like that.  If I were actually planning to put a laptop in it, the pocket would be great, but since I'm not, it had to go.  

Unfortunately, I didn't decide that till after it was finished, so I had to take it apart, remove the divider pocket and put it back together.  I like it better now.


I didn't waste the zipper or the little business card holder that were on the pocket.  The zipper went on an inside zipper pocket the back above the patch pocket with the key clasp.


The business card holder went above the pocket on the front with the velcro flap closure.  Inside the front is an odd place for it, but what the heck.


I didn't realize when I was picking out the fabrics for this project that they'd match Blue so well

"I like this one, Mama"


And of course I had help with the other ones as well.  My quality control team tends to sleep on the job.

"Comfy"
"Zzzzz......"   

Saturday, May 19, 2012

Upcycling

Have you ever wondered what to do with your empty goat, horse and chicken feed bags?

  
 Well wonder no more -  make tote bags out of them!  Today I'm going to tell you how.

Disclaimer: I can't take credit for this idea, my out-of-state, chicken-owning friend sent me one a couple of Christmases ago, and I love it.  It's perfect for my much-neglected knit afghan project.  Also, there are probably other tutorials out there for this, too but I need something to blog about, right?

I have a friend with a farm nearby and she has goats, sheep, alpacas and chickens.  She also has a friend/neighbor with horses, so there is no shortage of raw materials.  If you aren't so lucky, I've seen this done with wild bird food bags, too.  As long as they're made of thin woven plastic strips, they will work. 

I find it easier do to this assembly line style, but you can make just one if you're not stocking a farm stand.
 
Get your feed bag(s) and remove  bottom seams or bindings.  Sometimes they'll zip right off sometimes not.  If you cut them off, try to get as close to the stitching as you can.

Fold them flat, nice and neat along the existing creases and weigh them down for a bit to get them back in shape.  They're easier to work with if they aren't all crumpled.  I did this on my basement floor and stacked whatever I could find on them - cases of pop, paint cans, etc.


Once you've squashed them into submission, give the outsides a good wipe-down, then turn them inside out and do it again. Turning them inside out is probably the hardest part of this project.  It's noisy, too. The chicken feed bags are usually okay with just a damp cloth on the inside.  Some of the messier ones could use a dip in the washtub.  One of the senior horse food bags was particularly icky, so I rinsed that one.  
Next, grab your cutting mat, rotary cutter and a 24" ruler.  I turned my mat upside down and used a cutter with a blade that was too dull for fabric.  

Square up both ends and try to take off most of the big holes along the bottom.  I found the Scratch Grains bags were pretty randomly sewn along the bottom, so those bags are a bit shorter than the others.


Cut a 4" to 5" strip off one end to use for the handles.  One set I cut 5", but they felt a bit wide, so the next batch was 4-1/2".  I cut all of my handles from the top of the bag, but you can cut off the bottom, depending on the bag.

You can cut through or near the thicker fused section of the handle piece to make a long strip, if you want. I left them as rings, since they were easier for me to deal with and there was less chance of the ends fraying.


Fold the handle piece in half lengthwise with the right side out, then fold each edge towards the middle. You'll end up with a ring (or strip) that's a bit over 1" wide and four layers thick.  You can press this with a cool iron if you want, just use a piece of paper as a press cloth so you don't melt or separate the layers of the bag.  I didn't bother with the iron.  I creased them well and used quilt binding clips to hold the edges together.  Paper clips would work, too.  No pins!


Stitch about 1/8" from each folded edge. Don't sew through the fused part of the handle pieces - it's REALLY thick. Once both edges are stitched down, cut the thick part off completely. If you kind of curve the handles a bit, you'll be able to tell right where to cut.

After you remove the fused part, take the remaining strip and cut it half crosswise to make to make two handles.


Now, go back to the main part of the bag and fold about an inch of  the top edge towards the plain side of the bag.  Repeat to make a nice hem.


Tuck an end of one handle under the hem all the way to the top fold and clip in place.  I measured 3-1/2" from the side crease (about 6-1/2" from the outside edge) and put the outside edge of the handle there.  You can put them anywhere, except on top of that fused section. Place and clip the other end of the handle the same way, being careful not to twist the strips.  You'll do this on the front and back of the bag.


Sew about 1/8" above the lower edge of the hem to hold the handles in place. Fold the handles up, clip in place and stitch about 1/8" down from the top of bag.  When you get to the handles, you can stitch an 'X' on them, but I didn't. 
  

Sew a 1/2" seam along the bottom of the bag then zigzag in the seam allowance for good measure.

Mark a square above the seam line, at the edge of the bag.  The square needs to be half of the desired depth of the bag - the bigger the square, the deeper the bag. I used the measurement between the edge of the bag and the side crease for mine, to make them easier to fold up. On most of the bags, that was 3". Mark each end of the seam and both sides of the bag (so a total of four times).
The next part is a little tricky to explain.  Pull the front and back of the bag apart at the corner of the marked square and flatten it out, folding the seam allowance to one side. This will give you a triangle with straight line across it, perpendicular to your sewn seam, like this:

  
Now, sew on the marked line, being sure to back stitch at the beginning and end of seam. . Repeat for the other end of the bag.


Okay, you're done sewing!  Turn the bag right side out, pushing those gusset seams out to make a nice flat bottom. Fold it up like a paper grocery bag and admire your work!


The finished dimensions will vary, depending on the size of the original feed bag, how much you have to cut off to get rid of the old stitching lines and how big you make your gussets.
My bags are 21" to 22" tall (not including the handles), 15" wide and 6" deep.

Now, get sewing! 

If you'd like to have a bag, but don't want to make your own, you can buy one here.  They'll also be in the Flying Pig Fiber & Friends booth next weekend at the Great Lakes Fiber Show in Wooster. Which reminds me, I should be in the sewing room.

Thanks to Andrea for all of her kind words.  I didn't even have to pay her to say those things. :-)