Okay, I have about 6 weeks of stuff to catch up on, right? I'm going to start with the non-knitted stuff today, and I'll do the knitted stuff next time.
In the sewing department, it's mostly been about the grocery bags. You might remember that I cut out a boatload of them a while back. Well, I finished the first batch of them, but was a bad blogger and didn't take a picture of them. I gave most of them away to my family at Thanksgiving.
Then I made some more and did get a picture.
Aaaannnnnd a bunch more....
Some of these were done and have been pictured before.
I gave nearly all of these away to friends and John's family for Christmas. I'm definitely taking a break from making grocery bags for a while. I got a bunch more fabric out of my stash, though.
Sometime just after Thanksgiving, I got an unexpected package from St. Martin's Press with this inside.
That would an advance copy of Jonathan Maberry's latest Joe Ledger novel! It doesn't come out till March, but I have a copy now. I read the first two Joe Ledger books (Patient Zero and The Dragon Factory) and really enjoyed them. I went to the website and put my name on a list for a chance to get the book early, and they picked me! I currently have a couple of library books to finish (one of which is overdue), but then I'm looking forward to checking this one out. Thanks, St. Martin's Press!
Earlier this year, I joined a group that meets every Thursday night to knit. I LOVE this group. They are funny, inspirational and occasionally a bad influence on me. I have purchased a lot of yarn this year from and and because of them. But you should see the great stash I have! :) The second weekend of December, we had a Christmas party, with tons of good food and prezzies! Each of us brought food and enough stocking stuffers for everyone else. After we stuffed ourselves with the food, we opened our stockings. This was my contribution:
Tissue holders made with fabric that looks like knitting
We got some really excellent stuff! I didn't take any pictures, but Pam and Andrea both blogged about it. My foot is the one in the solid green sock in the pictures on Pam's blog. It was loads of fun. We had a pajama/Festivus party the night before Christmas Eve, with a Festivus Pole and Airing of Grievances. We skipped the Feats of Strength, but it was a good time. What a great group of people. I haven't known them long, but I love them to pieces.
Santa was very good to me. In keeping with the bag theme I've had going lately, I got some great bags for presents.
First, John gave me this:
A Namaste Newport bag in Hollywood Pink. The little knitted bag was one of my stocking stuffers. It matches well, doesn't it?
Then my friend S. in Massachusetts sent me this one, also pink:
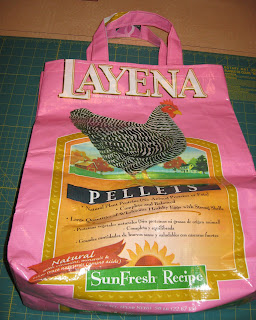
Isn't this great? It's made from a chicken feed bag. S. and her family raise chickens, so I'm sure there's no shortage of these bags at their house. It will be perfect for carrying around my latest project, which I'll show you next time. I'm going to show it to Andrea. It might be something she could sell at the farm once they open the shop.
Yesterday I got together with some other friends for craft day and more food. Two of us knit while the third one sewed. She gave me this.
A little pouch with this inside:
The storage pouch clips to a D-ring inside the bag
How cool is that? J. and S. are going to trade each other for their bags, since S. is part of this group, but now lives in a different state. I've known these friends a lot longer than my new knitting friends, but I love them to pieces, too!
In other news, I was on vacation all of last week and this week. Today I'm catching up on all the Christmas DVDs I didn't get to watch before Christmas. It's going to be really hard going back to work on Tuesday.
The cats have enjoyed my being home during the day, too.
"We love the heated kitty bed."
Next time: Knitting!
Tuesday, December 28, 2010
Friday, December 24, 2010
Merry Christmas Eve!
I did some baking yesterday.
M&M pretzels and sweet potato rolls.
That and a pan of fudge are the extent of my holiday baking this year. If I make it, I'll eat it, and I don't want to gain back the 10 pounds I've lost since last month.
I thought I'd share the goodness with you, though.
The pretzels are super easy. Line a rimmed cookie sheet with parchment paper. That part is optional, but you'll thank me later. Lay out as many pretzels (I use Snyder's Snaps) as you can possibly get in there in a single layer. Place a candy melt (I used Wilton's white/vanilla, but you can use any color/flavor you like) on each pretzel. Bake at 250 degrees F for 8-10 minutes or until they are are shiny and soft the middle, but not completely melted goo. Take them out and put an M&M in the center. Let cool completely. Using the parchment helps make them faster, because you can slide one sheet off and immediately fill up the pan again. What you see in the picture is most of a 1-pound bag of pretzels, all of two 14-oz bags of candy melts and most of a bag of holiday milk chocolate M&Ms. I think the color contrast is very festive and they're very tasty. You could use dark chocolate or mint M&Ms, too.
The rolls are blatantly stolen from the 2001 Taste of Home's Quick Cooking Annual Recipes cookbook, page 172. The difference is that my bread machine bakes lousy bread, so I just use it for making dough. Here's the recipe:
Sweet Potato Bread
Recipe from Christi Ross, Mill Creek OK
1/2 c. plus 2 Tbsp warm milk (70-80 degrees)
1 egg, lightly beaten
1-1/2 tsp salt
4-1/2 Tbsp softened butter
2 Tbsp brown sugar
1/2 c. chopped canned sweet potatoes, drained
1/3 c. mini marshamallows
3 c. bread flour
2-1/4 tsp active dry yeast [equiv to 1 pkg]
In bread machine pan, place all ingredients in order suggested by the manufacturer . Select basic bread setting. Choose crust color and loaf size, if available. Bake according to bread machine directions (check dough after 5 minutes of mixing; add 1-2 Tbsp of water or flour if needed). Yield: 1 loaf (about 1-1/2 pounds).
My notes/mods: I soak the uncracked egg in hot water for a few minutes to warm it up. I don't chop the sweet potatoes, I mash them into the measuring cup with a fork. Then I measure the milk into a glass measuring cup, add the butter and sweet potatoes and microwave for about a minute to warm everything up before adding it to the machine. My dough always comes out a bit sticky so I skip the extra 2 Tbsp of milk and sometimes still need to add a bit more flour; your mileage may vary.
I make the dough in the machine, then knead small handfuls of dough into roll shapes and place them on a greased cookie sheet. Cover them with plastic wrap sprayed with cooking spray, and let rise in a warm place for 40-45 minutes. Bake at 350 degrees for 12-15 minutes or browned as you like them. I have small hands, so I get 18-24 rolls. It's not an exact measurement.
I don't have to go back to work till January but I decorated my monitor at work, anyway.
USB LED lights, from Big Lots -$4
I've been busy this week running errands, shopping, wrapping, baking, cleaning, sewing, and etc. It hasn't felt like much of a vaction yet.
I haven't done much decorating but...
"Mama loves me - she put up a tree in the living room for me to climb!"
More about my activities since mid-November later. I have to get back to my sewing room. Have a safe and Merry Christmas, everyone!
Friday, November 12, 2010
Still here
It's true I haven't been feeling the blogging mojo lately. I have been working on things, though.
I finally started the heels on my Karira socks:
I have about an inch of linen stitch done and have at least another inch to go. I knit linen stitch very slowly.
I finished one scarf and a matching hat that will go to my Secret Santa kid, but I haven't taken a picture yet. Since I finished one scarf, I started another one:
Noro Striped Scarf by Jared Flood
I'm using Noro Silk Garden yarn in colorways #284 and 268. It's 1x1 rib on an odd number of stitches, alternating the two colorways every 2 rows. Since the yarns are self-striping you get the cool fading effect. The color changes keep it interesting. I'm making mine narrower than Jared's - 31 stitches instead of 39.
I also finally got around to working on some more grocery bags. I'm taking them to my uncle's for Thanksgiving, so I have to get busy. These are almost done.
They just need the 2 bottom seams and the handles sewn together at the top. I might have cut out a few more:
There are still 7 of them under the sewing table waiting to be sewn up, and I want to cut out at least one more, but I have to dig out lining fabric for it. I'm still pulling fabric out of my stash for these. You really don't want to see my fabric closet.
I don't have to have these *all* done by Turkey day, but I wanted to get a few more "manly" colors/prints sewn up, in case my male cousin wants some. I'm taking the last two weeks of the year off, so I'll have time to finish up the rest of them by Christmas. Of course if there aren't (m)any takers over the holidays, I'm going to have these things coming out my ears.
Emma's been busy, too.
"Sitting on this scrunchie, keeping your seat warm for you, Mama!"
Saturday, October 16, 2010
Ugh
I have a cold. I've *had* a cold for the last week. I hate colds. I took Monday off from work, but I ended up working from home part of the day since they were shorthanded in the office.
On Sunday, I took a sweater fitness class with Anne Hanson. I was really looking forward to it, but thanks to the cold, I didn't enjoy it as much as I should have. I didn't take any pictures, but Anne did a great blog post about her weekend here. I did learn a few things, some bad, some good. My waist is now the same size as my hips were in college (bad). Also, you should pick a sweater size that fits your back shoulder measurement (good). Have someone measure from the top curve of one shoulder up and over to the top curve of the other shoulder. Pick a pattern that fits that measurement, then adjust the rest of it to your body. I bought a bunch of her patterns while I was there. Someday I'll get around to them.
Meanwhile, I've been working on my socks. I'm a couple of rounds farther than this picture. I have about 10 rounds to go before I start the heels.
Karira sock pattern, Destination Yarn in Tuscany colorway
There's a new baby in my extended family! My cousin had this little beauty this week:
"My name is Josie"
She'll get the quilt I made last month when I meet her at Thanksgiving. I just need to make a label for it.
In other news. I got a package in the mail this week and someone helped me open it.
Anyone want to guess who my helper was?
"What'd I do?"
Monday, October 4, 2010
Banana Pineapple Cake
Here's the recipe for the cake I made the weekend before last. It's based on this recipe plus some of the comments.
Banana Pineapple Cake
3 c. all-purpose flour
1 c. granulated sugar
1 c. firmly packed brown sugar
1 tsp baking soda
1 tsp ground cinnamon
1 tsp salt
2 c. diced/mashed bananas
1/2 c. cooking oil
1-1/2 tsp vanilla extract
3 eggs
1 c. drained crushed pineapple, (reserve juice)
1/2 c. reserved pineapple juice
Sift together flour, sugars, soda, cinnamon and salt. Add remaining ingredients and pour into a greased tube pan. Bake at 350 degrees for about an hour or until the cake tests clean. Cool 15 minutes in pan, then invert onto a serving plate. Cool completely. Glaze as follows: Mix about 1 cup of powdered sugar with enough pineapple juice to make a thick glaze. Drizzle glaze over cake.
Enjoy!
Wednesday, September 29, 2010
42
If you're a Douglas Adams fan, you know that 42 is the answer. But what's the question? How about - "How old are you?" Yep, I'm now 42. And how did I spend the last few weeks of being 41?
Well, I made this baby quilt for my cousin's baby, who is due in a few weeks:
I use the Disappearing 9-Patch technique with a couple of charm packs plus a few extra 10-inch squares. On the back, I used a non-pill fleece print:
I still have to make a label, once baby Josie is actually born. I hope she likes it!
I worked on my socks:
Plain vanilla socks in Koigu KPPPM
And more socks [did you know it takes longer to knit lace?]
Karira socks in Destination Yarn, Tuscany colorway
And a scarf:
Garter stitch scarf in Bernat Softee Chunky yarn
I went to quilt camp, but I didn't accomplish much there. I put together the back for Big Blue, which I didn't get a picture of before I sent it to the quilter. I'll get pictures when it comes back. I also did some stealth sewing that I can't show you yet.
When I wasn't knitting or sewing, I hit a few of the shops on the 2010 Yarn Discovery Tour. I only made it to 6 of the 13 shops, but I won a prize! This is the shop prize from Soft 'n Sassy:
Namaste Binder bag, The Knitter's Guide to Yarn Cocktails (book), a pair of size 10.5 wood needles, a pack of Eucalan wipes and some project labels.
And a picture of the inside of the bag:
Now, I admit the color combination would not have been my first choice, but I think it's growing on me. Now to fill up the pockets with all my knitting goodies.... :-)
Over the weekend, I went to my friends' annual Oktoberfest party. I made a pretty good banana-pineapple bundt cake to take, which I didn't get a picture of. I'll post the recipe later this week or over the weekend, though.
Oh, and while I was in my sewing room, naturally, I had help.
"Mama, what's that out the window?"
Monday, September 6, 2010
Brick Bag Tutorial
Okay this is going to be a long one. At long last I've put together a tutorial for making those small project bags. I will apologize in advance for the quality of some of the pictures. I'm crafty, but I'm a truly lousy photographer.
First, gather your supplies. You'll need a rectangular piece of quilted fabric, a zipper the length of the short size of fabric, some ribbon for a handle, matching thread and some kind of marking tool.
I scored some of the these quilted placemats on clearance at JoAnn Fabrics a couple of years ago for $0.97. It's roughly 12" by 18", give or take 1/2" or so, and I used a 12" zipper. If your zipper is longer than that, it's okay.
My finished bag is about 7" long, 5" wide and 3" tall. You can adjust the size by adjusting the size of the quilted fabric you start with. The long side should be roughly 2" longer than the desired finished height plus the width times two (5+3=8, times 2 = 16 + 2 = 18). The short side should be 2" bigger than the length plus the height (7 + 3 = 10 + 2 = 12). I think. My math might be off a bit, so hopefully you won't get your heart set on exact sizes.
If you're using pre-quilted yardage or are quilting the fabric yourself, I recommend finishing the edges with an overcast or zigzag stitch to help keep the quilting from coming apart.
Step 1: Pin the zipper to the short side of the quilted fabric, right sides together, pulling the tab down a bit to keep it out of the way.
I pinned the zipper about 1/8" from the edge of the fabric
Step 2: Stitch 1/4" from the edge of the zipper tape.
When you get close to the zipper tab, stop with the needle down, zip up the zipper, then complete the seam.
Step 3: Pin the other edge of the zipper tape to the other short side of the quilted fabric.
Step 4: Stitch 1/4" from the edge of the zipper tape, as before.
Moving the zipper tab to keep it out of the way.
Step 5: Fold the fabric back from the seam and topstitch 1/8" from the seam. This will keep the fabric from getting caught in the zipper. Do this on both sides of the zipper.
Step 6: With the tube wrong side out, center the zipper and pin, as shown.
Open the zipper a bit, so you can turn it right side out later.
Step 7: Sew the pinned edges together.
Step 8: Now here's the fiddly part. For each corner, pull the side seam up and fold it back along the side fold. Center the seam and mark the height along the edge of the ruler.
45-degree line is along the edge, the seam is 1-1/2" from the edge, 3" chalk line is along the bottom of the ruler.
Step 9: Stitch along the marked line.
Repeat steps 8 and 9 for all 4 corners.
Step 10: On the end where the zipper tab is when it's closed, take a few stitches out along the new seam line so you can insert the ribbon for the handle. You need the opening to be a bit wider than the ribbon. Do this on both sides on that end. Sorry, this is a truly horrible picture.
And this one isn't much better.
Step 11: Cut a piece of ribbon a bit longer than the side of the bag. I cut mine 8-1/2" long. Insert the end of the ribbon into the opening in the seam line on each side, making sure the ribbon isn't twisted. Pin in place.
Step 12: Stitch over the seam line to catch the ribbon.
Step 13: Using a hand needle, tack the points to the seam line on the inside.
You could use pinking shears to trim the points off, but I think they add structure to the bag.
Step 14: Turn the bag right side out and you're done.
I added a removable stitch marker.
Oh and don't forget to thank your assistants for all their hard work.
"Sleeping here, Mama...."
Tuesday, August 24, 2010
Twins!
You might recall my friends and I made a couple of quilts for some twins last year. The babies have grown up a bit since then:
Henry and Jack
They're in town for the week and we went to the Akron Zoo today. Here they are with Mom and Dad in the train.
That's a small caboose!
They have some pretty cool pillars in garden area at the zoo:
Rumor has it they light up at night
We rode the carousel.
Marjorie and Julie
And this scene looked vaguely familiar to me.
I have no idea why.....
"Mama! There's a kitten on me! But she's kinda warm and the A/C is on...."
In crafty news, I've made progress on my two sets of twin socks.
Karira socks
Plain socks - my camera doesn't photograph purple very well
And guess what I finished?
Julie's head, Big Blue (top only) and me
Now I just have to get a backing made before my next guild meeting so I can give it to the machine quilter. Yay!!!!
Subscribe to:
Posts (Atom)